Wednesday 29 August 2007

Tentang kulo


************ I’m Just a NewBie but I Learn to be a Stupied *************


************ Selamat datang di jono site silah akan ada melihat-lihat blog ini.created by jono on warnet citynet lampung *************


kulo hanya orang yang coba untuk berbagi kepada saudara pembaca sekalian apabila ada sesutu yang tidak sedap menurut anda wahai pembaca budiman.Walauw komentar yang tidak penak silahkan ken saja .di web ini tidak ada larangan untuk menghina tau mengenyek silahakan saya berikan 98% hal anda .Toh ada sudah gede tapi kalo ada yang gk gede kulo minta ngapuro(maaf).yayayayayaya.
Neg kene sampean iso delok beberapa artikel yang mungkin berguna untuk anda sekalian.Apabila anda posting di web ini kiyambaan harapkan anda memberikan komentar walau menyakitkan hati gpp kok .Kiyambaan hanya wong deso yang mencoba untuk berbagi kepada anda semua yang membutuhkan informasi yang anda cari ya sapa tao ada di dalam site ini.Site ini baru nebeng aja karena kalo buat sendiri belom bisa ya nebeng aja lah dulu ya doa kan wae ben kulo iso gawe web server dewe hehehehe.
  • Nama lengkap kulo Hari budi saputro
  • Tempat,tanggal lahir Tanjung karang,05 oktober 1987
  • Tempat kuliah Politeknik bandar lampung
  • E-maill jono_lpg@yahoo.com
Apabila anda merasa puas dengan apa yang ada dapat kan sekarng anda adalah orang yang terpuji.Dan apa bila ada orang yang tidah pernah puas untuk melakukan hal-hal yang berguna demi masyarakat atau demi orang banyak anda adalah manusia yang mulia.menurut sapa yayaya gak taulalah .


************ created by jono on warnet citynet lampung *************

tutorial-mikrotik

ni ada sedikit ilmu dr gw untuk sipa aja yg mao belajar mikrotik

Langkah-langkah berikut adalah dasar-dasar setup mikrotik yang dikonfigurasikan untuk jaringan
sederhana sebagai gateway server.

1. Langkah pertama adalah install Mikrotik RouterOS pada PC atau pasang DOM.(paling 10 menit selesai)

2. Login Pada Mikrotik Routers melalui console :
MikroTik v2.9.6

Login: admin
Password: (kosongkan)

Sampai langkah ini kita sudah bisa masuk pada mesin Mikrotik. User default adalah admin
dan tanpa password, tinggal ketik admin kemudian tekan tombol enter.

3. Untuk keamanan ganti password default
[admin@Mikrotik] > password
old password: *****
new password: *****
retype new password: *****
[admin@ Mikrotik]] >

4. Mengganti nama Mikrotik Router, pada langkah ini nama server akan diganti menjadi “XAVIERO” (nama ini sih bebas2 aja mo diganti)
[admin@Mikrotik] > system identity set name=jono

[admin@jono] >

5. Melihat interface pada Mikrotik Router
[admin@jono] > interface print
Flags: X - disabled, D - dynamic, R - running
# NAME TYPE RX-RATE TX-RATE MTU
0 R ether1 ether 0 0 1500
1 R ether2 ether 0 0 1500
[admin@jono] >

6. Memberikan IP address pada interface Mikrotik. Misalkan ether1 akan kita gunakan untuk koneksi ke Internet dengan IP 202.154.89.152 dan ether2 akan kita gunakan untuk network local kita dengan IP 192.168.0.1

[admin@jono] > ip address add address=202.154.89.152
netmask=255.255.255.0 interface=ether1
[admin@jono] > ip address add address=192.168.0.1
netmask=255.255.255.0 interface=ether2

7. Melihat konfigurasi IP address yang sudah kita berikan
[admin@jono] >ip address print

8. Memberikan default Gateway, diasumsikan gateway untuk koneksi internet adalah 192.168.0.254
[admin@jono] > /ip route add gateway=202.154.5.36

9. Melihat Tabel routing pada Mikrotik Routers
[admin@jono] > ip route print


10. Tes Ping ke Gateway untuk memastikan konfigurasi sudah benar
[admin@jono] > ping 202.154.5.36
192.168.0.254 64 byte ping: ttl=64 time<1 ttl="64" max =" 0/0.0/0"> ip dns set primary-dns=202.152.5.36 allow-remoterequests=no
[admin@jono] > ip dns set secondary-dns=202.152.5.39 allow-remoterequests=no

12. Melihat konfigurasi DNS
[admin@jono] > ip dns print
primary-dns: 202.152.5.36
secondary-dns: 202.152.5.39
allow-remote-requests: no
cache-size: 2048KiB
cache-max-ttl: 1w
cache-used: 16KiB


13. Tes untuk akses domain, misalnya dengan ping nama domain
[admin@jono] > ping yahoo.com
216.109.112.135 64 byte ping: ttl=48 time=250 ms
Jika sudah berhasil reply berarti seting DNS sudah benar.

14. Setup Masquerading, Jika Mikrotik akan kita pergunakan sebagai gateway server maka agar client computer pada network dapat terkoneksi ke internet perlu kita beri masquerading.
[admin@jono]> ip firewall nat add action=masquerade outinterface=
ether1 chain:srcnat

15. Melihat konfigurasi Masquerading
[admin@jono]ip firewall nat print
Flags: X - disabled, I - invalid, D - dynamic
0 chain=srcnat out-interface=ether1 action=masquerade

Setelah langkah ini bisa dilakukan pemeriksaan untuk koneksi dari jaringan local. Dan jika berhasil berarti kita sudah berhasil melakukan instalasi Mikrotik Router sebagai Gateway server.

<======================= created by jono and mikrotik.com ====================>

Tutorial Load Balancing


ini ada ilmu tentang Load Balancing sorry ya semua engglish gw males gartiin nya (gk bisa juga sih)ini gambar denah nya


Configuration export from the gateway router:

/ ip address
add address=192.168.0.1/24 network=192.168.0.0 broadcast=192.168.0.255 interface=Local comment="" \
disabled=no
add address=10.111.0.2/24 network=10.111.0.0 broadcast=10.111.0.255 interface=wlan2 \
comment="" disabled=no
add address=10.112.0.2/24 network=10.112.0.0 broadcast=10.112.0.255 interface=wlan1 \
comment="" disabled=no
/ ip firewall mangle
add chain=prerouting in-interface=Local connection-state=new nth=1,1,0 \
action=mark-connection new-connection-mark=odd passthrough=yes comment="" \
disabled=no
add chain=prerouting in-interface=Local connection-mark=odd action=mark-routing \
new-routing-mark=odd passthrough=no comment="" disabled=no
add chain=prerouting in-interface=Local connection-state=new nth=1,1,1 \
action=mark-connection new-connection-mark=even passthrough=yes comment="" \
disabled=no
add chain=prerouting in-interface=Local connection-mark=even action=mark-routing \
new-routing-mark=even passthrough=no comment="" disabled=no
/ ip firewall nat
add chain=srcnat connection-mark=odd action=src-nat to-addresses=10.111.0.2 \
to-ports=0-65535 comment="" disabled=no
add chain=srcnat connection-mark=even action=src-nat to-addresses=10.112.0.2 \
to-ports=0-65535 comment="" disabled=no
/ ip route
add dst-address=0.0.0.0/0 gateway=10.111.0.1 scope=255 target-scope=10 routing-mark=odd \
comment="" disabled=no
add dst-address=0.0.0.0/0 gateway=10.112.0.1 scope=255 target-scope=10 routing-mark=even \
comment="" disabled=no
add dst-address=0.0.0.0/0 gateway=10.112.0.1 scope=255 target-scope=10 comment="" \
disabled=no

[edit] Explanation

First we give a code snippet and then explain what it actually does.
[edit] Mangle

/ ip address
add address=192.168.0.1/24 network=192.168.0.0 broadcast=192.168.0.255 interface=Local comment="" \
disabled=no
add address=10.111.0.2/24 network=10.111.0.0 broadcast=10.111.0.255 interface=wlan2 \
comment="" disabled=no
add address=10.112.0.2/24 network=10.112.0.0 broadcast=10.112.0.255 interface=wlan1 \
comment="" disabled=no

The router has two upstream (WAN) interfaces with the addresses of 10.111.0.2/24 and 10.112.0.2/24. The LAN interface has the name "Local" and IP address of 192.168.0.1/24.

/ ip firewall mangle

add chain=prerouting in-interface=Local connection-state=new nth=1,1,0 \
action=mark-connection new-connection-mark=odd passthrough=yes comment="" \
disabled=no


First we take every second packet that establishes new session (note connection-state=new), and mark it with connection mark "odd". Consequently all successive packets belonging to the same session will carry the connection mark "odd". Note that we are passing these packets to the second rule (passthrough=yes) to place a routing mark on these packets in addition to the connection mark.

add chain=prerouting in-interface=Local connection-mark=odd action=mark-routing \
new-routing-mark=odd passthrough=no comment="" disabled=no

The rule above places the routing mark "odd" on all packets that belong to the "odd" connection and stops processing all other mangle in prerouting chain rules for these packets.

add chain=prerouting in-interface=Local connection-state=new nth=1,1,1 \
action=mark-connection new-connection-mark=even passthrough=yes comment="" \
disabled=no
add chain=prerouting in-interface=Local connection-mark=even action=mark-routing \
new-routing-mark=even passthrough=no comment="" disabled=no

These rules do the same for the remaining half of the traffic as the first two rules for the first half of the traffic.

The code above effectively means that each new connection initiated through the router from the local network will be marked as either "odd" or "even" with both routing and connection marks.
[edit] NAT

/ ip firewall nat
add chain=srcnat connection-mark=odd action=src-nat to-addresses=10.111.0.2 \
to-ports=0-65535 comment="" disabled=no
add chain=srcnat connection-mark=even action=src-nat to-addresses=10.112.0.2 \
to-ports=0-65535 comment="" disabled=no

All traffic marked "odd" is being NATted to source IP address of 10.111.0.2, while traffic marked "even" gets "10.112.0.2" source IP address.
[edit] Routing

/ ip route
add dst-address=0.0.0.0/0 gateway=10.111.0.1 scope=255 target-scope=10 routing-mark=odd \
comment="" disabled=no
add dst-address=0.0.0.0/0 gateway=10.112.0.1 scope=255 target-scope=10 routing-mark=even \
comment="" disabled=no
add dst-address=0.0.0.0/0 gateway=10.112.0.1 scope=255 target-scope=10 comment="" \
disabled=no comment="gateway for the router itself"

For all traffic marked "odd" (consequently having 10.111.0.2 translated source address) we use 10.111.0.1 gateway. In the same manner all traffic marked "even" is routed through the 10.112.0.1 gateway. Finally, we have one additional entry specifying that traffic from the router itself (the traffic without any routing marks) should go to 10.112.0.1 gateway.

<===========************ created by http://wiki.mikrotik.com ************* ======>

Load Balancing over Multiple Gateways

From MikroTik Wiki
Jump to: navigation, search

ini adalah rule yang digunakan dalam sistem ini
Image:dual_gw_01.jpg

ini ada sedikit ilmu tentang loadbalancing yang gw tau sorry ada sedikit bahasa inggis ya gw males gartiin nya


Let us assume we use for our workstations IP addresses from network 192.168.100.0/24. The IP addresses are assigned as follows:

* 192.168.100.1-127 are used for Group A workstations
* 192.168.100.128-253 are used for Group B workstations
* 192.168.100.254 is used for the router.

All workstations have IP configuration with the IP address from the relevant group, they all have network mask 255.255.255.0, and 192.168.100.254 is the default gateway for them. We will talk about DNS servers later.

Now, when we have workstations divided into groups, we can refer to them using subnet addressing:

* Group A is 192.168.100.0/25, i.e., addresses 192.168.100.0-127
* Group B is 192.168.100.128/25, i.e., addresses 192.168.100.128-255

If you do not understand this, take the TCP/IP Basics course,
or, look for some resources about subnetting on the Internet!

We need to add two IP Firewall Mangle rules to mark the packets originated from Group A or Group B workstations.

For Group A, specify

* Chain prerouting and Src. Address 192.168.100.0/25
* Action mark routing and New Routing Mark GroupA.

Image:dual_gw_22.jpg

It is a good practice to add a comment as well. Your mangle rules might be interesting for someone else and for yourself as well after some time.

For Group B, specify

* Chain prerouting and Src. Address 192.168.100.128/25
* Action mark routing and New Routing Mark GroupB

Image:dual_gw_25.jpg

All IP traffic coming from workstations is marked with the routing marks GroupA or GroupB. We can use these marks in the routing table.

Next, we should specify two default routes (destination 0.0.0.0/0) with appropriate routing marks and gateways:

Image:dual_gw_26.jpg

ini tidak akan langsung bekerja , anda harus megeset masquerading for your LAN! dan pengaturan NAT rule for Src. Address 192.168.100.0/24 and Action masquerade:

Image:dual_gw_28.jpg

Test t tracing the route ke IP address on the Internet or isp !


C:\>tracert -d 8.8.8.8

Tracing route to 8.8.8.8 over a maximum of 30 hops

1 2 ms 2 ms 2 ms 192.168.100.254
2 10 ms 4 ms 3 ms 10.1.0.1
...

From a workstation of Group B, it should go like this:

C:\>tracert -d 8.8.8.8

Tracing route to 8.8.8.8 over a maximum of 30 hops

1 2 ms 2 ms 2 ms 192.168.100.254
2 10 ms 4 ms 3 ms 10.5.8.1
...

anda bisa langsung cobadeh lo semua kagak bakal rugi deh gw jamin boss


<======************ created by MikroTik Wiki*************========>

Mikrotik DHCP Server

Untuk membuat DHCP Server diperlukan langkah-langkah sebagai berikut :
1. Membuat address pool dan menentukan IP Range
2. Mengaktifkan DHCP server.
Sedangkan untuk membuat Internet Gateway Server, inti langkahnya adalah melakukan masquerading yang akan melewatkan paket-paket data ke user.

monggo baca tulisan di bawah ini ya.........:

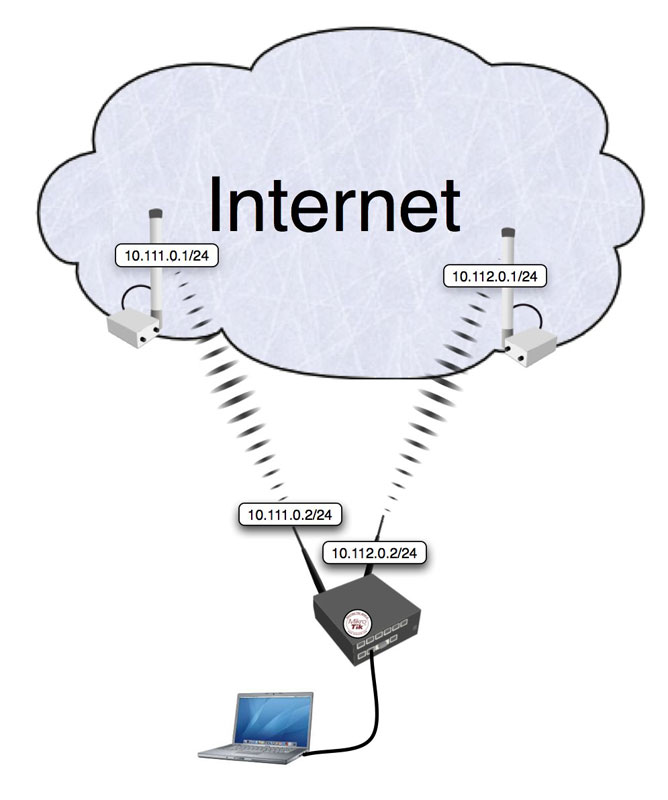
1. Mikrotik di install pada CPU dengan 2 ethernet card, 1 interface utk koneksi ke internet, 1 interface utk konek ke lokal.

2. IP address :
- gateway (mis: ADSL modem) : 192.168.100.100
- DNS : 192.168.100.110
- interface utk internet : 192.168.100.1
- interface utk lokal : 192.168.0.1

Untuk memulainya, kita lihat interface yang ada pada Mikrotik Router

[admin@Mikrotik] > interface print
Flags: X - disabled, D - dynamic, R - running
# NAME TYPE RX-RATE TX-RATE MTU
0 R ether1 ether 0 0 1500
1 R ether2 ether 0 0 1500[admin@Mikrotik] >

kemudian set IP address pada interface Mikrotik. Misalkan ether1 akan kita gunakan untuk koneksi ke Internet dengan IP 192.168.100.1 dan ether2 akan kita gunakan untuk network local kita dengan IP 192.168.0.1

[admin@mikrotik] > ip address add address=192.168.100.1 netmask=255.255.255.0 interface=ether1

[admin@mikrotik] > ip address add address=192.168.0.1 netmask=255.255.255.0 interface=ether2

[admin@mikrotik] >ip address print
Flags: X - disabled, I - invalid, D - dynamic
# ADDRESS NETWORK BROADCAST INTERFACE
0 192.168.100.1/24 192.168.100.0 192.168.100.255 ether1
1 192.168.0.1/24 192.168.0.0 192.168.0.255 ether2
[admin@mikrotik] >

Setelah selesai Barulah kita bisa melakukan setup DHCP server pada Mikrotik.

1. Membuat address pool

/ip pool add name=dhcp-pool ranges=192.168.0.2-192.168.0.100
/ip dhcp-server network add address=192.168.0.0/24 gateway=192.168.0.1
2. Tentukan interface yang dipergunakan dan aktifkan DHCP Server.

/ip dhcp-server add interface=ether2 address-pool=dhcp-pool enable 0

[admin@mikrotik] > ip dhcp-server print
Flags: X - disabled, I - invalid
# NAME INTERFACE RELAY ADDRESS-POOL LEASE-TIME ADD-ARP
0 dhcp1 ether2
sampai tahap ini, DHCP server telah selesai untuk dipergunakan dan sudah bisa di test dari user.

Langkah Selanjutnya adalah membuat internet gateway, Misalnya Modem indosat sebagai gateway untuk koneksi internet adalah 202.154.5.39 dan DNS Servernya 202.152.5.36,secondary dns 202.152.5.39 maka lakukan setting default gateway dengan perintah berikut :

[admin@mikrotik] > /ip route add gateway=202.154.5.39

3. Melihat Tabel routing pada Mikrotik Routers

[admin@mikrotik] > ip route print
untuk melihat sudah terpasang nya gateway pokoke itu lah


Lanjutkan dengan Setup DNS

[admin@mikrotik] > ip dns set primary-dns=202.152.5.36 secondary-ds=202.152.5.39 allow-remoterequests=yes

[admin@mikrotik] > ip dns print
primary-dns: 202.152.5.36
secondary-dns: 202.152.5.39
allow-remote-requests: yes
cache-size: 2048KiB
cache-max-ttl: 1w
cache-used: 16KiB
[admin@mikrotik] >

4. Tes untuk akses domain, misalnya dengan ping nama domain

[admin@mikrotik] > ping yahoo.com

216.109.112.135 64 byte ping: ttl=48 time=250 ms
10 packets transmitted, 10 packets received, 0% packet loss
round-trip min/avg/max = 571/571.0/571 ms

Jika sudah berhasil reply berarti seting DNS sudah benar.

5. Setup Masquerading, ini adalah langkah utama untuk menjadikan Mikrotik sebagai gateway server

[admin@mikrotik] > ip firewall nat add action=masquerade outinterface=ether1chain: srcnat

[admin@mikrotik] >

[admin@mikrotik] ip firewall nat print
Flags: X - disabled, I - invalid, D - dynamic
0 chain=srcnat out-interface=ether1 action=masquerade
[admin@mikrotik] >
Selesai, tinggal test koneksi dari user. seharusnya dengan cara ini user sudah bisa terhubung ke internet.

Cara ini memang cara yang paling mudah untuk membuat user dapat terhubung ke internet, namun tingkat keamanannya masih rendah dan diperlukan pengaturan firewall. Mudah-mudahan saya bisa membahasnya dilain waktu.tapi kalo dikasi firewall anda harus bisa memilah.karana mikrotik pa bila ping diatas seribu lebik maka router ini akan hank.and gak cucok untuk proxy.

<=========************created by ttp://yoyok.wordpress.com*************======>

Wednesday 1 August 2007

Tips & trik

ini saya ada sedikit ilmu yang saya dapat di hari ini semoga dapat berguna.

1.cara nyepetin browsing klai heheh.

Cara pertama yaitu menyetting browser dapat dilakukan oleh pengguna Internet Explorer dan Mozilla Firefox. Bagi pengguna Internet Explorer klik menu [Tools] [Internet Option], klik tab [General]. Pada opsi "Temperory Internet files", klik [Settings] lalu Geser slider-nya. Hal itu untuk membuat cache (lokasi penyimpanan sementara) untuk web yang anda buka, sebaliknya disediakan sekitar 5% dari Hard disk.

Bagi pengguna Mozilla Firefox anda dapat mengetikkan "about:config" pada address bar,. setelah itu ubah "network.http.pipelining" dan "network.http.proxy pipelining" menjadi "true", serta isi "network.http.pipelining.maxrequests" antara 30 –100 ( semakin besar semakin cepat ). Yang terakhir klik kanan dimana saja dan pilih New->Integer , tuliskan "nglayout.initialpaint.delay" lalu isi dengan 0.
Untuk trik kedua, pertama anda harus mendaftar di www.openDNS.com . Setelah itu masuk ke Control Panel dari start menu, pilih network connections lalu pilih koneksi anda dan klik tombol properties. Pada bagian Internet protokol anda bisa pilih TCP/IP dan klik properties. Masukkan angka 208.67.222.222 dan 208.67.220.220 pada opsi DNS dan restart komputer anda.
Setelah melakukan 2 tips di atas sekarang anda pasti akan mendapat kecepatan akses yang lebih kencang. Bagi yang masih belum puas dengan kecepatan aksesnya sekarang dapat menggunakan trik yang ke tiga yaitu Google Web Accelerator.
Untuk memakai Google Web Accelerator anda harus memenuhi kriteria antara lain Operating System anda harus Windows XP atau Windows 2000 dan browser anda harus Internet Explorer 5.5+ atau Mozilla Firefox 1.0+. Kalau untuk browser lainnya sebenarnya juga bisa, tetapi anda harus meng-konfigurasi proxy settings dari browser anda dengan menambah 127.0.0.1:9100 pada HTTP.

2 cara block IP client atau blok IP dari luar yang mau masuk mesin mikrotik
ip firewall filter
>add chain=forward src-address=192.168.10.10 dst-port=80 protocol=tcp action=drop

kira-kira begitu commandnya mas.. semoga membantu. jangan lupa jalan-jalan ke sini juga mas.. buat pencerahan.


http://id.wordpress.com/tag/router/
http://id.wordpress.com/tag/mikrotik/
http://wiki.mikrotik.com/